Building a Linux Media Network, one step at a time

Tuesday, March 28, 2006

Day of Disappointment

What a bummer. I was just about ready to wrap this whole thing up when all of a sudden the LCD display stopped working. It wouldn't even POST, as soon as I hooked up the power it just showed some garbage on the screen. My first assumption was that I need a new display - no big deal, the eBay seller has lots more of them and he was a pleasure to deal with. So I dropped another $15 bucks on a new display. Then I tried to investigate the problem a little bit more and found that the parallel port on my motherboard seems to have crapped out. The values that I write to the SELECT_IN, INIT, AUTO_FD, and STROBE are all reset after about 125Ms, whereas before they would persist until I changed them. This definitely isn't good. They also all reset themselves to low (which in the case of select, auto feed, and strobe is actually +5v), which is kind of weird.

Anyways, Logic Supply has been great to me so far, so I'm hoping that they'll process this as a warranty claim without any hiccups.

Monday, March 20, 2006

Removing the Hard Disk

One of the last steps in this project is to switch the operating system from the hard disk to a compact flash card.

The CF card I'm using is a 1Gb SanDisk Ultra II. I also have a CFDisk CF-IDE adaptor so I can plug the card into a regular IDE channel.

I thought it would be a simple matter of booting into a separate Debian install (I still have one on it's own partition from my first attempt at all this) and copying the entire file system from the hard disk to the flash card. Unfortunately, I was unable to write to the Ultra II card while it was in the IDE adaptor. Actually, I was able to correctly write about 999,999 bytes out of every 1,000,000, but that just ain't good enough. This turned out to be a very tricky problem to track down. Basically I wound up having to recursively diff each file in the source and the destination to determine that there were some bytes that got mangled during the copy. Also, running /sbin/badblocks -t random -w /dev/hdb indicated that certain writes would just randomly fail. [Note that the above command will destroy all existing data on your hard disk]

The solution was to insert the CF card into a standard USB card reader, the kind you might have to go with your digital camera. Debian automatically recognized the device and mounted it as /dev/sdb. It was all much more convenient than I imagined it would be. In the end, I guess the write speed through USB was slow enough not to cause a problem. Once the filesystem was copied over, and I was ready to switch to a read-only file system, I reconnected the card to the IDE adaptor, because reading from the card works fine.

I followed the instructions that I described here to get the ramdisk up and running, and then borrowed a couple points from here: notably, creating a symbolic link from /proc/mounts to /etc/mtab and editing /etc/fstab to include the "ro" option for the root filesystem.

That's all. Because these disk writes are (infinitesimally) unreliable and it's a real pain in the ass to switch between the hard disk and the cf-card, I'm going to go back to the hard disk for now and then try this whole process one more time when I am sure that I'm 100% finished.

Tuesday, March 14, 2006

Tying it all together

Let's recap all the components of the Media Center so far:

  • Xine video player + Unichrome XXMC driver for hardware playback

  • IR receiver + LIRC daemon with Xine integration for wireless control

  • 4-line LCD display + LCDProc daemon to show status information

  • Backed-up DVD media available via NFS mount to backfire


Pretty much all that's left is to wire all these things together in software. The requirements for that piece of software are:

  • Browse through the available media files

  • Play selected media file

  • Update the LCD display with title of current media file, pause/play/stop status, and position in stream

  • The 'browse' and 'select' actions must be executable via the remote control


That's a pretty rough set of requirements, but it'll do for now. It took me a couple days, but I came up with a bit of software that meets these pretty nicely. It's about 1500 lines of code spead out over a dozen or so Java classes. I'm calling it 'mediabrowser' for now and you can download it here. You'll need JDK 1.5 to build it, or JRE 1.5 to run it. Both can be obtained from java.sun.com.

Building Mediabrowser


You'll need a recent version of Apache Ant to do the build. Just run ant clean dist. The file build/dist/mediabrowser.tar.gz will be created. Extract that to your installation directory and you're ready to go.

Configuring Mediabrowser


Running Mediabrowser is fairly straightforward. Before you get started with it, ensure that the LIRC and LCDd daemons are running. Make sure that you started lircd with the -l option so it can provide the IR data over a TCP/IP port. Then follow these steps to adjust the Mediabrowser to suit your configuration:
  • Edit conf/xineloader.properties. Verify that xl.cmd.xine matches your Xine command.
  • Editmb.properties. Adjust mb.media.root to match the root directory for your media collection. If you are using a remote control, change the property names for the ir.btnmap.[...] properties to match the button names in your LIRC configuration file. That will map each button to a Java KeyEvent.
  • Finally, edit the sample index file index.xml and place it in the root media directory that you specified above. This is what the Mediabrowser will inspect to get information about your collection.

Running Mediabrowser


Running the Mediabrowser is as simple as java -cp conf:bin ca.razorwire.mb.gui.MediaBrowser. A full-screen window should appear, displaying the entries in your index.xml file. You can navigate the screen and select an entry using the buttons on your remote that you defined in the mb.properties file.

How It Works


Briefly: When the GUI launches, it starts a thread to monitor for LIRC output on the default LIRC port, 8765. When it receives LIRC data that it recognizes it generates a corresponding Java AWT event indicating that a key has been typed (this is what the btnmap and keymap properties in mb.properties are for). This event is sent to a hidden UI component in the GUI that always has the keyboard input focus.

As far as this UI component is concerned, a key has just been pressed. You can see this yourself by pressing any of the keys defined in the properties file. The behaviour should be exactly the same as if you'd pressed a button on the remote. It then maps the keypress to a UI action - either scrolling through the title list, scrolling the current title's description summary, or playing the title.

When you start playing a title, the GUI launches a new thread to start the Xine application as a separate process. It also stops processing LIRC output, because we don't to process any button-presses that were meant only for Xine. If the LCD screen is enabled, this thread keeps a reference to the LCD driver and the title of the current track. It monitors our hacked-up Xine output to catch the stream position updates, and prints out the track title and current position to the LCD screen. When the Xine application completes, the thread dies and control is returned to the GUI.

TODO:

  • Need some screenshots!

  • Need a sexier GUI! Right now it's just the standard Swing look and feel. Perfectly functional, but not that attractive compared to most Media Center offerings. Maybe whip something up in OpenGL to take advantage of the hardware acceleration?

  • MythTV integration... haven't got a capture card yet so I'm still quite a ways behind on the Myth scene.

Friday, March 10, 2006

Tweak to DVDBackup

Just a quick aside here to talk about a software component that will be going on backfire, the media server. There's an incredibly useful utility floating around the net called DVDBackup. As far as I can tell there is no official site for it but some useful information about it can be found here.

Version 0.1 has a small bug in it that caused a segfault while I was backing up the Firefly TV series. A patched version is available here. The only difference is moving the call to ifoClose in DVDGetInfo to line 852.

Wednesday, March 08, 2006

Extracting command activity from Xine

In this post I described how to tweak the Xine source code to print the current stream position in a friendly format. Printing out the command activity (ie. 'pause', 'play', 'stop', etc.) is similarly easy. In the file src/xitk/event.c, just add a line in the function gui_execute_action_id that looks like this: fprintf( stdout, "action\t%d\n", action); fflush( stdout );. Then run make debug && make install-debug to deploy the changes.

LCD Status Display

One neat feature I'd like to incorporate into this media center is the ability to display the unit's status off-screen. By that, I mean the same sort of functionality that your DVD or CD player gives you: a panel to show the current position in the track, the play/pause/stop status, etc.

I started by ordering a 20-character, 4-line display from "rainbow_city_store" on eBay. The service was prompt and wholly satisfactory. This display is compatible with the popular HD44780 LCD controller, and can basically be plugged straight into a parallel port once you've got the wiring all sorted out. The seller provided a couple of schematic diagrams, and also some helpful links to more wiring diagrams and various HD44780 projects. I wired up the display to the parallel port as described here (I didn't use the port cups, but the schematic was great).

(ignore the extra notes for now)

Once the display was wired up I investigated a project called LCDProc. This is a useful little tool that can display things like CPU, Memory, and Disk usage on an external display. But what's more important is the component of LCDProc that can drive the HD44780 over the parallel port (LCDd). This really simplifies the interface to the display by providing simple commands that can be executed via a regular TCP/IP socket.

Here are some notes on establishing communication with the display:

  • At the hardware level, you can check that your signals are correct by using a multimeter to measure the voltage between certain pins and the ground. The SP800 sets the data pins to 3.3V (high) or 0.5V (low). The other pins will be between 1.5V and 5V high or 0.5V low, I believe.

  • If you have applied power to Pin 2 on the LCD and grounded pins 1 and 3, you should see lines 2 and 4 on the display illuminate (barely). If you apply power to pin 15 and ground pin 16 (make sure you get that right) you will activate the backlight, and the lines should be much more visible. This is the HD44780 self-test. You may be stuck here a while :)

  • Pin 1 on the parallel port (pin 6 on the display) is the Strobe. If you are interfacing directly with the hardware (ie. not using LCDd), be sure to set this to high, and then to low to tell the LCD controller that the signal on the data pins are valid.

  • Access to the data pins of the parallel port on the SP800 is at IO 0x378. You can access the status pins at 0x38A. More info here. Some sample code is here. Compile like so: gcc -o lptout lptout.c. Just tweak the outb call to direct the byte to the data or status pins.

  • If you are using LCDproc/LCDd and have wired your display like mine, you want the HD44780 driver and the "8bit" wiring configuration.

  • Build and install LCDd like so:
    • # Download and extract the tarball to /usr/local/src
      cd lcdproc-0.4.5
      ./configure --enable-drivers=hd44780
      make && make install

    • Edit LCDd.conf. Uncomment the line "Driver=HD44780" and comment out any other drivers. In the [HD44780] section, ensure the Port parameter is set to 0x378 and the ConnectionType parameter is set to 8bit. The size should also be set to 20x4. Finally, copy this file to /etc.

    • Start LCDd by running LCDd /etc/LCDd.conf. It runs in the foreground by default. This is configurable within the conf file. If LCDd was able to connect and interface with your display, the screen should change from the two active lines (self-test screen) to something like this:
      LCDProc Server
      Clients: 0
      Screens: 0

      (The display pinout on my LCD screen is actually at the top of the display, so this screen currently appears upside-down. If you know of a way to rotate the display via the controller I would love to know.)

    • Test the connection by opening a new terminal window and running lcdproc C. This will try to connect to LCDd on the default address and port and display your CPU usage statistics on the LCD screen. If it works, congratulations!


Extra Credit


That backlight ain't gonna last forever, you know. It would be convenient if we could turn it on and off at will. A simple potentiometer or switch between pin 16 and ground would do the trick. Or... we could wire it up to one of the unused status pins on the parallel port and control it by a transistor... oooh! Good idea!

Turns out, I wasn't the first one to think of it. But I did it slightly differently than described in the (excellent) 
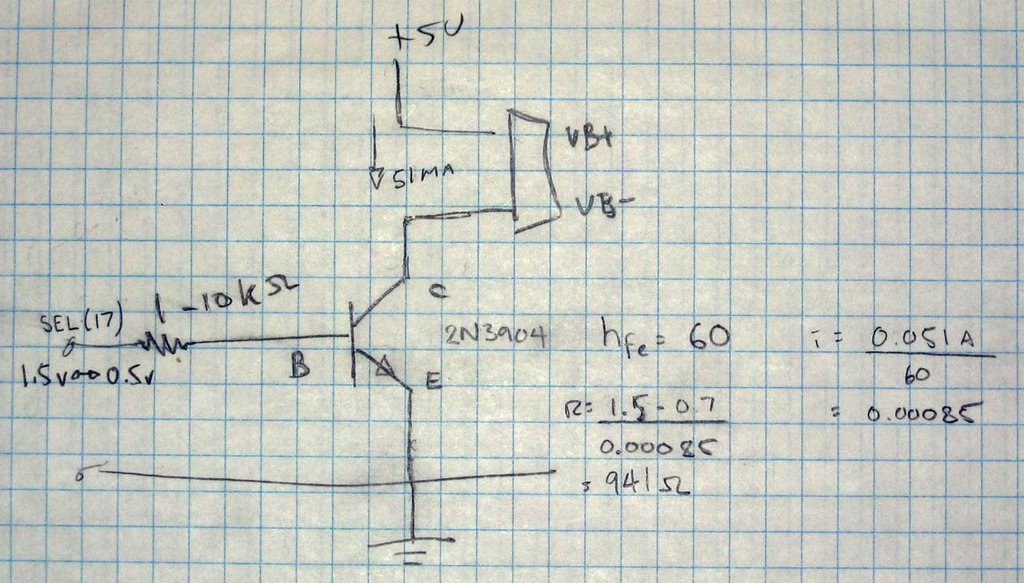
LCDproc documentation. Here's the schematic:


The transistor is a 2N3904, which we happened to have lying around the office. The collector goes to pin 16 on the LCD, the emitter goes to ground, and the base to pin 17 of the parallel port via a 1K resistor. If you're interested, here's the math, as I understand it:

  • By hooking up an ammeter in series with the LCD display pin 15 we can see that the backlight draws ~51mA of current.

  • The two figures we need from the 2N3904 data sheet are the gain (hfe) and the base/emitter saturation VBE(sat), which is 0.65 ~= 0.7 for a current draw of 0.051A.

  • The high voltage on parallel port pin 17 (SEL) will be 1.5V. We subtract the saturation voltage from this to get 0.8V.

  • We calculate the required resistance for the transistor like so: 0.8V / ( 0.051A / 60 ). This gives us a resistance of 941 Ohms, ~= 1K.


LCDd has some backlight functionality built-in, but I had to tweak it a little bit to get it to work with this setup. There appears to be some conflict with pin 17 and the "multiple display" feature of LCDproc - when I started LCDd, the backlight would blink on and off repeatedly. The easiest way to stop this, if you're just using one display like me, is to force the displayID to 0 in the function lcdwinamp_HD44780_senddata (server/drivers/hd44780-winamp.c). I also had to swap the values for BacklightBrightness and BacklightOffBrightness in LCDd.conf. Then I just set the Backlight parameter in the HD44780 section of the conf file to "yes".

After the code change, run make && make install to deploy the changes. Restart LCDd. You can test the backlight by telnetting to localhost 13666 and entering the following commands:
hello
screen_add 0
backlight on
backlight off

Note that the backlight command has no effect until at least one screen has been created.
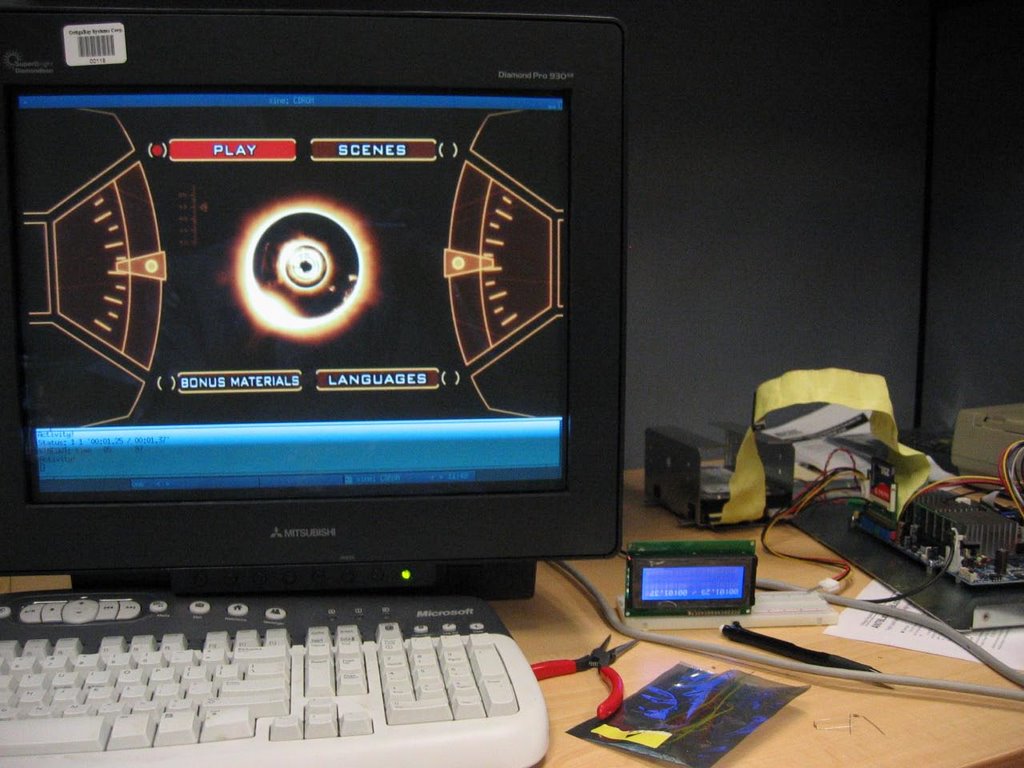
Here's a shot of the LCD display in action. If you look closely, you can see that it's displaying the timing data that we just took out of Xine. More on that in the next post.

Monday, March 06, 2006

Stream Position Data in Xine

Now that Xine is up and running, it would be handy to be able to extract the stream position data from the application and display it elsewhere (on a status display, for instance). This way, we could see how much of the movie we've played, how much time remains, etc.

This is pretty easy, once you figure out where to look. In the xine-ui source, go into src/xitk/stdctl.c. In the function xine_stdctl_loop, change the line:
int secs, last_secs; to int secs, last_secs, len_secs, stream_pos;

Just below that, you should see where last_secs is initialized to 1. Copy that line twice and replace last_secs with len_secs and stream_pos.

Near the end of that function, replace the call to gui_xine_get_pos_length(...) with gui_xine_get_pos_length( gGui->stream, &stream_pos, &secs, &len_secs ). Divide len_secs by 1000 afterwards, as is already done with secs.

Replace the call to fprintf with this: fprintf(stdout, "time\t%d\t%d\n", secs, len_secs).

Run make && make install to deploy your changes.

Finally, Xine suppresses output to standard out (stdout) shortly after it prints its introductory banner/copyright data. The easiest way to prevent this is by prepending the --verbose option to the command line. A slightly cleaner way (only cleaner in terms of the output) is to run make clean && make debug && make install_debug to deploy your changes instead. If everything's working right, you should see a bunch of lines like this displayed on the screen:
time 0 97
time 1 97
time 2 97

The first number is the current position in seconds in the current stream and the second is the length of the current stream, in seconds.