Building a Linux Media Network, one step at a time

Monday, February 27, 2006

Trimming the disk usage

Here are some areas where we can probably trim some fat from the hard disk:
  • /usr/share/doc - 20M
  • /usr/share/man - 6.7M
  • /usr/local/bin/via - 9.7M (this was where I downloaded the VIA DRI binaries to, but they've been installed so I can remove them
  • /usr/X11R6/man - 12M
  • /usr/X11R6/lib/X11/doc - 14M
  • /usr/X11R6/lib/modules/dri - 24M (but obviously not the VIA driver)
  • /lib/modules/2.4xxx/* - 29M


Also removing binutils bison flex g++ g++-3.3 gcc gcc-3.3 gcc-3.3-base kernel-source-2.6.8 linux-kernel-headers make through apt-get will free another 60Mb or so. Best to do this before deleting the above files, in case any dependencies get mucked up.

This will be entirely offset by the installation of the Java 1.5 Runtime Environment, which I'm considering installing... that will weigh in at 91Mb. Ouch. Maybe need to rethink that.

Saturday, February 25, 2006

Getting Video

Just some notes on building and installing the requisite tools for DVD playback on the Via Epia SP800 (CN400 Chipset)... will clean up as time allows... see the sidebar for contact info if you have questions.

Building Xine:
I grabbed Debian's ALSA (Advanced Linux Sound Architecture) user-space packages first since I enabled ALSA support when I rebuilt the kernel... apt-get install libasound2 libasound2-dev. Configuring ALSA is as simple as running alsaconf and selecting the VIA sound driver.

Download source tarballs for xine-lib and xine-ui from http://xinehq.de
For xine-lib:
./configure --prefix=/usr
make && make install

For xine-ui:
./configure --prefix=/usr --x-includes=/usr/X11R6/include --x-libraries=/usr/X11R6/lib
I needed to patch the file src/xitk/oxine/Makefile. It does not include the X11 headers as specified in the ./configure command line. So just search for AM_CPPFLAGS = and add -I/usr/X11R6/include to the end of the line. Then,
make && make install

The last piece of the puzzle is to invoke xine and tell it to use the drivers we have just set up: ALSA for audio, and the Via XVMC driver for video. Let's say that you've backed up the Serenity DVD to /media/movies/SERENITY.iso. The command would then be:

xine -V xxmc -A alsa dvd:/media/movies/SERENITY.iso

Assuming that you have removed the CSS encryption from the DVD. That will be covered in the next lesson.

Note that we specify the "xxmc" video driver. Running xine --help shows that the more intuitively-named driver "xvmc" is available, but specifying that on the command line crashes xine. Using "xxmc" works, and we can tell that it's using the onboard MPEG accelerator because running top while watching the movie shows CPU utilization at around 3%. Contrast that to the un-accelerated driver, where CPU utilization will be around 20-30%.

Building and Configuring LIRC

Building LIRC is actually pretty simple. Download the source package from lirc.org and extract it to /usr/local/src. As indicated in the INSTALL file in that package, compiling it is as simple as running setup.sh && make install. But you'll need the "dialog" package to run the setup script, so apt-get install dialog first. It's a small package and you can remove it as soon as you're done.

When I ran the setup script it correctly detected my port configuration (IO and IRQ). Note that the onboard serial header is COM2, known to Linux as /dev/ttyS1. The default parameters for this port on the SP800 are 2F8 and IRQ3.

The configure script expects the kernel source to be installed in /usr/src. I had actually moved it to a separate partition to free up some room, so I just mounted the partition and made a symbolic link to the source. The source should be in a directory like kernel-source-2.6.8.

Save the configuration, run ./configure, and then make && make install. If you encounter the error "LIRC modules currently require module unloading...", go back into the kernel source, run "make menuconfig" and select "Loadable Module Support -> Module Unloading" from the menu options. The run make && make install in the kernel source directory, reboot, and try to build LIRC again.

Once LIRC is built you should follow the instructions at LIRC.org to get the driver up and running. The quickest way to test the input is like this:

  1. Tell the kernel to release the serial port by running setserial /dev/ttyS1 uart none

  2. Insert the LIRC serial module into the kernel: modprobe -v lirc_serial

  3. Run mode2. This program should display no output until you start pressing buttons on your remote control. If it prints values while no buttons are being pressed, you probably have an interference problem.

  4. If you get errors complaining that the device is busy, make sure that you've a) enabled COM2 in the VIA BIOS, b) configured LIRC's setup script with the correct values for COM2, and c) referred to the device /dev/ttyS1. I banged my head against the wall for half a day because I didn't twig to the zero-based port numbering.


Then it's just a matter of using irrecord to generate a .conf file, and starting lircd with that .conf file. Those steps are all very well documented at lirc.org

IR Remote Control and LIRC

LIRC is a Linux utility that allows input from many common types of remote controls. It integrates very nicely with XMMS, the media player I've chosen to install on Fulcrum.

The LIRC website has a bunch of instructions on how to build your own homebrew IR receiver that hooks up to a standard serial port. From what I understand, it's not "true" serial communication as all the data is transferred over one of the handshake lines, but everything seems to work out OK.

The schematic that I used is here. I ordered all the parts from Digikey, except the breadboard, which I got from a local electronics store. And the case, which is an Altoids tin.

Here's the Digikey parts list:


Digikey Part #Description
PNA4602M-NDInfrared photoreciver + IC
AN78L05-NDVoltage Regulator
P974-NDCapacitor - 4.7 uf 25V
P4.7KBACT-ND4.7 kilo-ohm resistor
C3APT-1018M-NDIDC Cable
1N4148DICT-NDDiode

Some notes:

  • Digikey charges a substantial service fee for orders under $35 (CAD). So if there's anything else you need, tack in onto the order. Pick up a few of the voltage regulators and a couple of the IR receivers in case anything goes sideways. Digikey also sells several similar receivers (PNA4612M00YB-ND, PNA4612M00XD-ND) with metal holders, which may help reduce interference.

  • I can't say for sure that the diode I've listed above is correct. I made a mistake and got the surface-mount casing; but I checked the catalog and that looks like the right one.

  • The pinouts on the IR receiver (substitute for the TSOP1738 in the schematic) and the voltage regulator are different than the ones described on the LIRC homebrew instruction page. As that page suggests, double-check that you've got them wired correctly.

  • One end of the IDC cable I specified above is a perfect fit for the serial header on the SP800 motherboard. The other end can be munged a little bit to fit into a 0.1" printed circuitboard on an angle. Since I had to visit the local electronics shop anyways, I picked up a proper IDC 16 pin crimp connector and used that instead.

  • Total costs were $33.60 to Digikey + ~= $10.00 to the local electronics shop. Definitely more practical to pick up a Windows Media Centre remote + USB receiver (which I believe is compatible with LIRC), but not nearly as much fun.


Assembling the circuit is actually really easy, and I say that as someone with very little experience in electronics. I'd suggest wiring it up on a solderless breadboard first, especially if you are as unfamiliar with this sort of thing as I was. Once you're comfortable with how everything hooks together, it's then just a challenge of laying it out on the breadboard with as little soldering as possible.

This is pretty much how I laid it out on the final breadboard, although I stretched it out a little bit to give myself some more room to work:


This is a picture of the final product with the case open:


I added the case (a butchered Altoids Mints container) because I was trying to resolve some interference problems. These problems only arose while I was working on this at the office, not at home. The case didn't actually resolve the problem, but I'm not too worried about it.

Finally, an up-to-date picture of Fulcrum. The Altoids case is closed in the picture. Notice that I have attached a proper momentary contact switch, so I don't have to short the jumpers with the needlenose pliers. That was fun for a while but got tiring. Notice also that the ghetto piece of plywood has been replaced with a ghetto piece of 1/16" sheet steel. However, that piece of steel was taken from a damaged Cray XD1, so I think I score some geek points for that.


That covers the hardware. Next up, building and configuring the software.

Wednesday, February 22, 2006

Building up from Minimal Debian

I'm a sucker for punishment, so I've decided to put all my progress on hold for a while and try to rebuild the system from (almost) scratch. The OS was getting a little bloated, and I'd like to keep a tighter rein on what's getting installed. This post is a compilation of several earlier posts, with some extra details added here and there.

Note that you can skip steps 1 and 2 by burning the Debian businesscard ISO to a CD and configuring your BIOS to boot from CD.

Note also that I've kept my previous installation on a different partition. If this doesn't work out, I can switch back with a simple change to the GRUB boot menu.

Finally... building xorg (the X Windows Server) from scratch is really a post unto itself... the documentation for version 6.9.0 is available here. If you still have questions I'll do my best to help.


  • Format a fresh partition with the ext3 file system.

  • Follow the instructions here to load the debian installer. Briefly,
    mkdir /boot/debian-installer
    cp businesscard.iso /boot
    cd debian-installer
    wget http://ftp.debian.org/debian/dists/stable/main/installer-i386/current/images/hd-media/initrd.gz
    wget http://ftp.debian.org/debian/dists/stable/main/installer-i386/current/images/hd-media/vmlinuz
    edit /boot/menu/grub.lst, add new entry. Recall that the partition numbering is 0-based.
    root(0,0)
    kernel /boot/debian-installer/vmlinuz ramdisk_size=12000 root=/dev/ram0
    initrd /boot/debian-installer/initrd.gz

  • Activate the installer by rebooting.

    • accept the defaults up to the screen where you are asked about disk partitioning. Choose to manually edit the partition table. Choose the partition you were just in as the install target. Do not format the partition if you are booting from the hard disk. Specify "/" as the mount point.

    • Reboot. The installation proceeds. When you are asked about the system's "profile", ie. webserver, desktop, etc. select the packages manually. This launches the aptitude package manager frontend.

    • Select "kernel-source-2.6.8" "libncurses5-dev" "module-init-tools" "flex" "bison" "g++" "libpam-dev". You can use the "/" key to open a search box and the "n" key to advance through the search hits. Use the "+" key to select packages for installation. Installing these packages will install a number of ancillary developer tools.

    • Quit the installer

  • Log in as root. (All further steps should be performed as root)

  • Build a more appropriate kernel as described here
    cd /usr/src
    tar xvfj kernel-source-2.6.8.tar.bz2 && rm kernel-source-2.6.8.tar.bz2
    cd kernel-source-2.6.8
    make menuconfig

  • In the kernel config GUI, select "Processor Type and Features" > "Processor Family" > "VIA C3-2 (Nehemiah)"

  • Optionally disable drivers to get faster compile time: ISDN, Telephony, all graphics drivers except VGA and VESA

  • Enabled ALSA (and all its sub-items, and the VIA drivers), Parallel Port Support, PC-Style Hardware

  • Exit, save, run make all install modules_install Wait a long, long time.

  • Run mkinitrd -o /boot/initrd-2.6.8 2.6.8

  • Add new entry to /boot/grub/menu.lst:
    title Debian 2.6.8
    root (hd0,2)
    kernel /boot/vmlinuz-2.6.8 root=/dev/hda3 ro
    initrd /boot/initrd-2.6.8
    savedefault
    boot

  • Get and Build the xorg source (for the X server)
    cd /usr/local/src
    wget http://xorg.freedesktop.org/releases/X11R6.9.0/src-single/X11R6.9.0.tar.bz2
    tar xvfj X11R6.9.0.tar.bz2 && rm X11R6.9.0.tar.bz2
    cd xc/config/cf
    cp xorgsite.def host.def
    # Note: the xorg distribution comes with its dependencies,
    # but it does a shitty job building them. Also, none of the
    # executable perms have been set.
    cd ../../extras/expat
    chmod a+x configure
    ./configure --prefix=/usr && make && make install
    cd ../freetype2
    chmod a+x configure builds/unix/configure builds/unix/install-sh builds/unix-mkinstalldirs
    ./configure --prefix=/usr && make && make install
    cd ../..
    make World | tee World.log 2>&1
    make install install.man
    # Not sure if there's a more correct way to do this
    cd /usr/bin
    ln -s /usr/X11R6/bin X11

  • Download and build the Openchrome Drivers as described here. If you haven't got a SVN/CVS client, you can download one of the snapshot tarballs from openchrome.org. Here I have downloaded the source to /usr/local/src.

    cd /usr/local/src
    # Follow directions in README
    cd drm/linux-core
    make LINUXDIR=/usr/src/kernel-source-2.6.8 DRM_MODULES=via
    cp *.ko /lib/modules/2.6.8/kernel/drivers/char/drm/
    depmod -ae
    export PATH=$PATH:/usr/X11R6/bin
    xmkmf /usr/local/src/xc
    make && make install
    cd ../unichrome
    xmkmf /usr/local/src/xc

  • The DRM and Mesa stuff that's packaged with X.org is a piece of shit. To install the DRI drivers I had to download the binaries from here (just get the latest VIA drivers). Extract the tarball and copy unichrome_dri.so to /usr/X11R6/lib/modules/dri. You can follow the directions here to verify that hardware acceleration is being used. On GLXGears, the SP800 should be capable of about 30-60fps un-accelerated and approximately 500fps when hardware acceleration is active.

  • Download, Build and Install a Window Manager


    • Obtain the fluxbox development release source from http://fluxbox.sourceforge.net. Don't go with the "stable" 0.1.14 release; it doesn't even compile. ("stable"?!?)

    • Extract to /usr/local/src; Enter fluxbox directory

    • ./configure --prefix=/usr && make && make install

    • Edit the file /etc/X11/xinit/xinitrc. Remove the lines after "start some nice programs" and replace with:
      fluxbox & wmpid=$!
      wait $wmpid

    • Start the xserver with startx


Friday, February 17, 2006

Disabling the Ramdisk

Setting up the ramdisk as I just described was a little premature, because I'm not quite done with all my software installations yet. But at least now I know that it's possible. I can disable the ramdisk until I'm ready with these simple commands:

init 1
umount /var
mv /var /var_rd
mv /var_orig /var
chmod a-x /etc/init.d/setup_ramdisk

That still leaves the ramdisk_size kernel parameter in the GRUB configuration, but since we've disabled the ramdisk creation script that memory won't be consumed, so we're OK. Might as well leave it as-is, it's one less thing to re-enable when the time comes.

Thursday, February 16, 2006

Setting up a Ramdisk

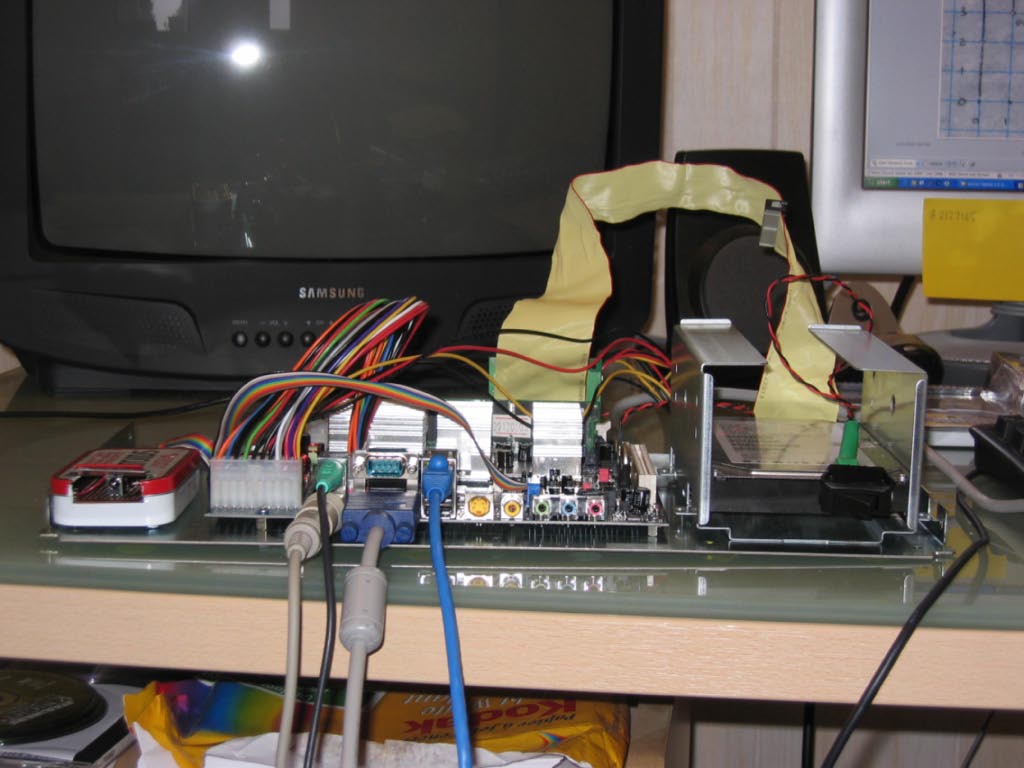
Wow, it's been a while since I've updated. I've been busy building the infrared receiver described here: http://www.lirc.org/receivers.html. I'll post more about that once I've got the last few kinks worked out and had a chance to take some pics of it.

For now, though, I'll describe how I've altered the Linux install to make use of a ramdisk for parts of the filesystem. A ramdisk is a section of memory that the operating system treats like a regular disk. One advantage of using a ramdisk instead of a physical disk is that it provides really, really fast read/write times. A big disadvantage is that anything that you write to a ramdisk gets obliterated when your computer shuts down.

I'm using a ramdisk in this situation because when I switch Fulcrum over to compact flash, I want it to treat the CF card as a read-only file system. But because applications expect to be able to write data to /var and /tmp, we need to provide some write capability. We will "graft" the ramdisk onto the root filesystem, and none of the applications will even know they're writing to a ramdisk.

The linux kernel creates a bunch of ramdisks as soon as it starts, and identifies them as separate devices in the /dev filesystem. Do an ls there and you can see them, labelled from /dev/ram0 to /dev/ram15 or so.

The kernel restricts the size of these ramdisks based on the ramdisk_size kernel parameter. The value of this parameter is measured in kilobytes, so to define a ramdisk of 128Mb you would pass this as a kernel parameter in the GRUB configuration file, menu.lst:
ramdisk_size=131072
(131072 = 128 * 1024)

As far as I know, all ramdisks are created with the same size limit. If you know of a way to independently specify the size of each ramdisk, I would love to hear about it.

Let's deal with ram-ifying /var first. Obviously, the /var directory is full of important files and stuff. We want to:
  • Backup the whole damn thing
  • Save these files someplace safe
  • Empty out the /var directory
Then, on every boot:
  • Tell Linux to move the files from "someplace safe" to the ramdisk
  • Mount the ramdisk on /var
Here's a quick way to do the backup, presuming you have some unallocated space on your hard disk. In the example below, my OS is installed on /dev/hda2 and I've created a partition /dev/hda3 that is exactly the same size using fdisk -u. (Creating the backup target partition is pretty easy, it just takes a little adding and subtracting to determine the number of sectors and the end point of the partition)

# Do a byte-by-byte backup of /dev/hda2 to /dev/hda3
dd if=/dev/hda2 of=/dev/hda3 bs=16MB

Lastly, you can go into /boot/grub/menu.lst and clone the entries there to boot your new partition - or, you can just edit the existing entries by hand if you ever need to boot into that partition. Remember to change both the root(n,m) line and the root=/dev/hda(n) part of the GRUB entry.

Now that you've got a backup (hey - maybe test that it works, while you're at it), we can proceed with ram-ifying /var. Follow these commands:

#A flimsy way of "quieting" the system
#to prevent writes to /var while we work
init 1
#relocate the files
mv /var /var_orig
#create the new empty directory
mkdir /var
mkdir /mnt/rd
cd /etc/init.d
#create a script to do the work at every boot
cat setup_ramdisk << EOF
#! /bin/sh
echo "**** Initializing Ramdisk ****"
mkfs -V -t ext2 /dev/ram1
mount /dev/ram1 /mnt/rd
cp -a /var_orig/* /mnt/rd
umount /mnt/rd
mount /dev/ram1 /var
echo "Ramdisk Created"
EOF
# make it executable
chmod a+x setup_ramdisk
cd /etc/rcS.d
# make it run very early it the boot process
ln -s /etc/init.d/setup_ramdisk S03setup_ramdisk


The script that's embedded in those commands is actually what's responsible for most of the heavy-lifting (it's saved to /etc/init.d/setup_ramdisk). What it does is format the ramdisk using the ext2 file system, mount it to a temporary directory, copy all the stuff from the original /var directory, and then move the mount point from the temporary directory to /var.

At this point, double check that you've allowed for a big enough ramdisk in the kernel parameter. Do a df --si /var, grow that number by, say, 20%, and convert that to kilobytes and enter it into /boot/grub/menu.lst as described above.

Reboot, cross your fingers, and hopefully you won't even notice the difference!

If something goes wonky and your system won't boot, select your backed-up partition from the GRUB boot menu. Then mount the original parition and check for any mistakes. The messages during boot will tend to fly past before you can read them, so it may be very helpful to include a "sleep 60" command just after the "Ramdisk Created" line in the setup_ramdisk script.

I'm going to assume that everything has gone swimmingly and you've now got linux using a ramdisk for /var. The last step is to get it to use a ramdisk for /tmp as well.

I ran into a problem here. Because every ramdisk is the same size, and I need roughly 100Mb for /var, I didn't have enough free memory to create a whole new ramdisk for /tmp, which only needs a little bit anyways. The easiest workaround here is to just symbolically link /tmp to /var/tmp.


init 1
rm -rf /tmp
ln -s /var/tmp
chmod a+rw /tmp
chmod a+rw /var_orig/tmp


Make sure you get the permissions right, or nobody but root will be able to do very much.

Let me know how that works for you!

Thursday, February 09, 2006

LIRC: Help!

The above graph shows the 'space' values when I activate my remote control. Note that the noise around the 2000-level is constantly displayed during mode2.


The above graph shows the 'pulse' values for the same scenario. Again, the noise around the 2000-level is constantly printed during mode2.

Any ideas, please contact me. My name is Russ, you can reach me at [my name] at razorwire.ca

ps. Sorry that the colors got wanged.

Wednesday, February 01, 2006

Getting GUI (step 2)

What the hell, let's throw caution to the wind and just go with GNOME. It's a robust, widely supported GUI, although it's a little heavier than I'd like. Perhaps we can slim it down once we've got everything set up, but even if we can't, I think we'll still be well under 1Gb.

Installing GNOME is as easy as:

apt-get -t sarge-backports install x-window-system-core gnome-session gnome-applets nautilus metacity xscreensaver gdm gedit gnome-terminal


Reboot (or simply startx), and you're done.

Getting GUI (step 1)

The first step to getting a GUI (a window manager, actually) is to install an X server. With Debian, you can choose from at least 2 X servers: Xfree86 or Xorg. Xfree86 is the more popular choice, but we will need the Xorg server to be able to compile the driver for our on-board graphics card.

The biggest obstacle here is that the Xorg packages are listed as "experimental" and are not readily available with the standard configuration of apt-get. So, follow the instructions here to gain access to these experimental packages. Skip the bit between "To activate a package..." and "...as usual". It's much easier to just use the -t option to apt-get when you want to install one of the experimental packages.

Download the xserver-xorg package by running apt-get -t sarge-backports xserver-xorg. You can accept all the defaults for the X configuration process and just choose the "Vesa" driver for the graphics card.

Download the corresponding source code - we'll need this when we come to building the video driver. I don't think there's a Debian package for this code, so we'll have to download it the old fashioned way. Currently the xserver-xorg package is 6.9.0 and the corresponding source is available here. You can check the version of your xserver-xorg package in aptitude. Expand this file into /usr/local/src.

If you check the disk space with df --si /, you'll see that we're up at around 1.2Gb. At first blush, this is pretty bad. But do a df on /usr/src and /usr/local/src, and you'll see that over 750Mb of that is just source code, which will be removed long before we cut over to compact flash. So we're actually doing OK.

Now that we've got the X server up we just need a Window Manager. That'll be the next post.

Debian Post-Install

The more I use Debian, the more I like it. apt-get is a really powerful package management tool. The minimal install is a bit larger than I'd like, around 250Mb, but I've basically resigned myself to getting a bigger compact flash card, so it's not that big a deal. As long as I can keep it under 1Gb, I should be OK.

Here's how I customised the standard Debian install:

I got the installer onto the hard disk as described here.

I accepted all the defaults, the only tricky bit was to manually edit the partition table and force the install into one of my 2Gb partitions. That's just a matter of selecting the partition, specifying the file system you wish (I went with ext3), and setting it to be the root (/) mount point.

After the installer reboots, the last step in the installation process is to choose which "profile" you would like to set up the system with: file server, print server, web server, desktop, etc. The last option is to perform the package selection manually using aptitude, a frontend for apt-get. I went with that, and then promptly quit it without selecting any packages. This minimal install weighs in at 246Mb.

It's not quite suitable, though. The installer decided to use the i386 kernel, which is compatible with the VIA C3 chip, but doesn't take advantage of all its features. The modern (2.6.8) kernel has a special configuration for this chip, it's just a matter of specifying it at build-time. So let's build a fresh kernel.

The first thing to do is drag down the necessary packages via apt-get. This is going to incur another couple hundred megs of disk usage, but we can get rid of it all when we're done:

apt-get install kernel-source libncurses5-dev

Then, go into the /usr/src directory and expand the .tar.bz2 file:
tar xfvj kernel-source-2.6.8.tar.bz2
Then in the directory that just got created:

make mrproper menuconfig

This brings up the kernel configuration GUI. Under "processor family" select VIA C3-2 (Nehemiah). Exit. Save when prompted. Next, enter:

make install modules_install

And go get some coffee. Take a long lunch. Wash your car. Seriously. This will take about 3 hours, and 98% of this time will be spent compiling drivers for ISDN cards and SCSI devices and a whole host of other crap you don't need. If you know of a way to speed up this process, I'd love to know.

So far we've built and deployed the kernel and all the necessary kernel modules for the C3 chip. The penultimate step is to build a new initrd image:
mkinitrd -o /boot/initrd.img-2.6.8 2.6.8

And finally, to add the entries in the GRUB boot menu to boot our wonderful new creation:

title  Debian GNU/Linux, kernel 2.6.8
root (hd0,1)
kernel /boot/vmlinuz-2.6.8 root=/dev/hda2 ro
initrd /boot/initrd.img-2.6.8
savedefault
boot

title Debian GNU/Linux, kernel 2.6.8 (recovery mode)
root (hd0,1)
kernel /boot/vmlinuz-2.6.8 root=/dev/hda2 ro single
initrd /boot/initrd.img-2.6.8
savedefault
boot

Note that your value for the root parameter may vary - details explained here.

Don't expect anything fancy when you reboot - there's still no X server or window manager. I'll get to those next.